
Achieving true personalized wellness begins with understanding what is happening inside your body. For health-focused professionals and biohackers striving for peak performance, at-home biomarker testing offers a hands-on solution to decode your unique biology. With simple preparation and smart planning, you can follow professional biosampling protocols and collect accurate, contamination-free specimens right from home. Discover how strategic steps and expert guidance make it possible to unlock meaningful insights for your wellness journey.
Table of Contents
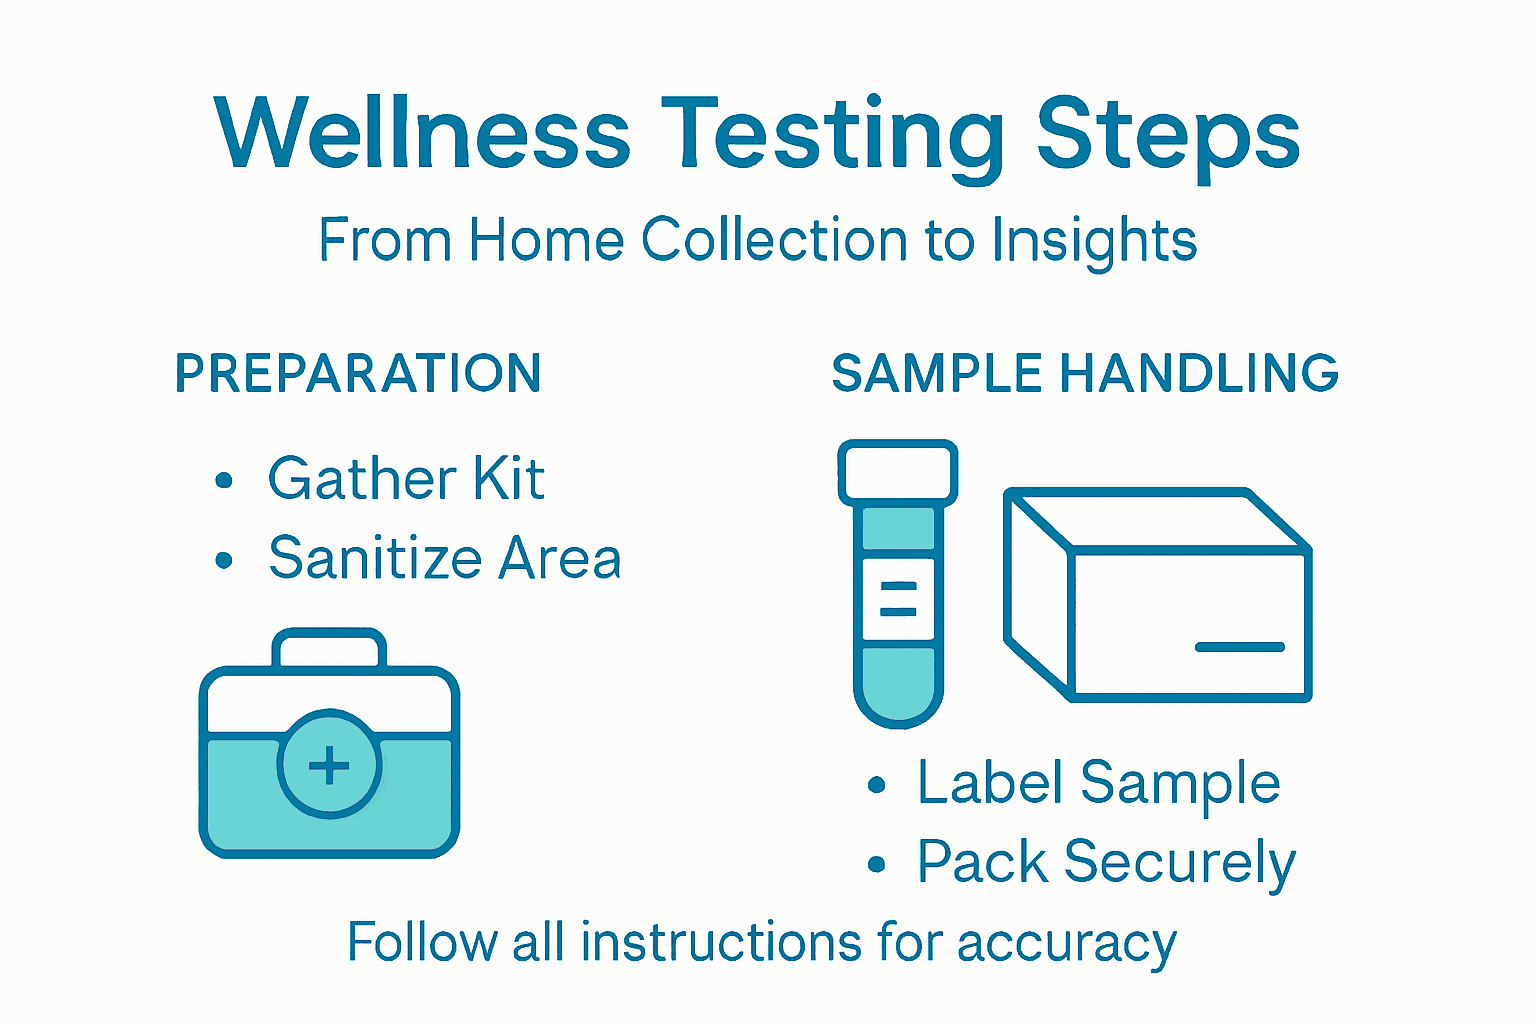
- Step 1: Prepare for At-Home Biomarker Collection
- Step 2: Collect and Secure Your Sample Effectively
- Step 3: Send and Track Sample for Swiss Analysis
- Step 4: Review and Interpret Your Biomarker Report
- Step 5: Apply Personalized Recommendations for Wellness
Quick Summary
| Key Point | Explanation |
|---|---|
| 1. Prepare Workspace for Sample Collection | Organize all materials in a clean, well-lit area to ensure accurate sample gathering. This reduces contamination risks and enhances sample integrity. |
| 2. Follow Collection Protocols Precisely | Adhere to detailed biosampling instructions to avoid errors during collection, ensuring that the sample is reliable for analysis. |
| 3. Use Proper Shipping Methods | Employ a triple packaging system to safely transport your sample. Clear labeling and documentation prevent mishandling and maintain sample quality during transit. |
| 4. Analyze Your Biomarker Report Carefully | Understand the structure and trends in your report to derive meaningful insights regarding your health and necessary adjustments. |
| 5. Implement Personalized Wellness Recommendations | Focus on actionable changes based on your biomarker data, integrating lifestyle adjustments that support overall health improvements. |
Step 1: Prepare for At-Home Biomarker Collection
Successful at-home biomarker collection requires strategic preparation to ensure accurate results. Your goal is to create an optimal environment and mindset for precise sample gathering, following professional biosampling protocols.
Start by gathering all necessary collection materials the night before your test. This typically includes your sample kit, collection tubes, lancets, alcohol swabs, bandages, and any specific instructions. Create a clean, well-lit workspace with a stable surface. Wash your hands thoroughly with warm water and mild soap, then dry completely to ensure proper skin preparation. If blood sampling is required, ensure you are well hydrated and have eaten a balanced meal within the past few hours to support smooth sample collection.
Organize your workspace methodically by laying out materials in the order you will use them. Read through the entire collection protocol carefully before beginning, noting any time-sensitive steps or special handling requirements. Keep your collection area free from potential contaminants and maintain a calm, relaxed state to minimize potential stress responses that could impact your sample.
Pro tip: Schedule your biomarker collection during a time when you are least likely to be interrupted, ensuring a smooth and precise sampling process.
Step 2: Collect and Secure Your Sample Effectively
Collecting and securing your biomarker sample requires precision and careful attention to detail. Your goal is to ensure sample integrity through meticulous biospecimen collection techniques.

Begin by sanitizing your hands and workspace thoroughly. If collecting a blood sample using a lancet, select the recommended spot on your fingertip typically the side of your middle or ring finger. Use a sterile alcohol swab to clean the puncture site and let it air dry completely to prevent contamination. When using a lancet, apply consistent pressure and follow the device instructions precisely. For dried blood spot collection, carefully place droplets onto the designated collection card, ensuring complete saturation without oversaturating the sample area.
After sample collection, immediately label your specimen with all required information such as date, time, and personal identification codes. Allow the sample to dry completely in a clean, flat area away from direct sunlight or heat sources. Place the dried sample in the provided protective sleeve or envelope, sealing it carefully to prevent external contamination. Double check that all packaging instructions are followed exactly before preparing the sample for shipment.
The table below compares common sample types and their handling considerations:
| Sample Type | Collection Method | Handling Priority | Typical Uses |
|---|---|---|---|
| Blood spots | Finger prick/lancet | Label, dry, prevent contamination | Metabolic panels, immune markers |
| Saliva | Tube collection/spit | Keep cool, avoid food/drink | Hormone monitoring, genetic tests |
| Urine | Container collection | Timely shipment, temperature control | Kidney, hydration assessment |
Pro tip: Keep your collection materials at room temperature and avoid touching the actual collection area to maintain sample purity.
Step 3: Send and Track Sample for Swiss Analysis
Successfully shipping your biomarker sample to Swiss laboratories requires careful attention to packaging and shipping regulations. Your goal is to ensure safe and compliant transport using precise biological substance shipping guidelines.
Prepare your sample for shipment by utilizing the triple packaging system. First, place your sealed sample container within an absorbent material inside a leak-proof secondary container. Then, enclose this package within a sturdy outer shipping container that provides additional protection. Clearly label the package with the appropriate Category B biological substance markings and include all required documentation. Most shipping services will require you to complete a biological substance declaration form specifying the contents and origin of your specimen.
Once packaged, select a shipping method that provides tracking capabilities. Most postal services and courier companies offer specialized biological sample shipping options with real time tracking. Obtain a tracking number and save all shipping receipts and documentation. Check the tracking status periodically to confirm your sample has been received by the Swiss laboratory and verify that it remains in proper condition during transit.
Pro tip: Schedule your shipment early in the week to avoid potential weekend transit delays and potential sample degradation.
Step 4: Review and Interpret Your Biomarker Report
Reviewing your biomarker report requires systematic analysis and understanding of complex health data. Your objective is to gain meaningful insights through comprehensive biomarker data interpretation.
Start by examining the overall report structure and understanding each biomarker category. Look for color coded or graphical indicators that show whether your results fall within optimal ranges. Pay special attention to reference ranges next to your specific values. Some markers might be categorized as low normal, high normal, or outside standard ranges. Cross reference these results with any provided explanatory notes that offer context about potential health implications.
If certain biomarkers appear outside standard ranges, do not panic. Consult with a healthcare professional who can provide personalized interpretation based on your complete health profile. Many biomarker reports include trend information showing how your markers have changed over time. Analyze these trends to understand your metabolic patterns and potential areas for targeted health optimization. Consider the interconnectedness of different biomarkers and how they might relate to your overall wellness strategy.
Pro tip: Create a digital or physical folder to track your biomarker reports over time, enabling you to visualize long term health trends and progress.
Step 5: Apply Personalized Recommendations for Wellness
Transforming your biomarker insights into actionable wellness strategies requires a structured approach to personalized preventive health interventions.
Begin by carefully reviewing each recommendation in your report and categorizing them into immediate, short term, and long term action items. Focus first on interventions that address markers significantly outside optimal ranges. These might include targeted nutritional supplements, specific dietary modifications, exercise adjustments, or lifestyle changes. Pay close attention to interconnected biomarkers that suggest systemic health patterns. For instance, if multiple metabolic markers indicate potential inflammation, your recommendations might include anti inflammatory nutrition strategies, stress reduction techniques, and targeted supplementation.
Implement changes incrementally and track your progress through follow up testing. Create a personalized wellness plan that integrates recommendations across nutrition, exercise, sleep, and stress management. Consider consulting with a healthcare professional who can provide nuanced guidance tailored to your specific biomarker profile. Remember that personalized recommendations are dynamic guides not rigid rules. Regularly reassess and adjust your approach based on ongoing biomarker trends and how your body responds to implemented changes.
Pro tip: Use a digital wellness tracking app or journal to document your health interventions and monitor their impact on your biomarker results.
Here’s a summary of important steps and their impact in the biomarker collection and analysis process:
| Step | Objective | Key Outcome | Impact on Results |
|---|---|---|---|
| Preparation | Ensure clean setup | Materials ready, low stress | Increases sample accuracy |
| Collection | Perform precise sampling | Properly labeled specimen | Preserves sample integrity |
| Shipment | Compliant packaging | Secure and tracked delivery | Prevents sample degradation |
| Review | Analyze data trends | Clear insight into health status | Guides wellness strategies |
| Application | Implement recommendations | Targeted lifestyle changes | Drives long-term health improvements |
Unlock Precise Health Insights with At-Home Biomarker Testing
If you found the “Wellness Testing Process Guide: Achieve Precise Health Insights” helpful, you understand how crucial careful preparation, accurate sample collection, and expert analysis are for meaningful health data. Many struggle with maintaining sample integrity, navigating shipping requirements, or interpreting complex biomarker reports. Biostarks addresses these challenges head-on by offering a streamlined Pro Collection Kit that simplifies your at-home testing experience with clear instructions and premium materials designed for precision.
Take control of your wellbeing today by choosing Biostarks for your biomarker testing needs. Our advanced Swiss mass spectrometry technology delivers detailed, actionable reports tailored to your unique health profile. Explore our full range of options at Biostarks and get started with the Public Collection for an easy entry or the specialized NHS Collection designed for elevated performance. Don’t wait to unlock the power of personalized health insights that drive real, lasting improvements.
Frequently Asked Questions
What materials do I need for at-home biomarker collection?
To successfully collect biomarker samples at home, prepare your sample kit, collection tubes, lancets, alcohol swabs, bandages, and any specific instructions. Organize these materials in a clean, well-lit workspace to ensure a smooth collection process.
How do I ensure accurate biomarker sample collection?
Accurate sample collection requires proper hand sanitation, hydration, and a calm mindset. Follow the collection protocol closely, and ensure minimal contamination by using sterile equipment and handling samples correctly.
What should I do if my biomarker report shows concerning results?
If you find that any biomarker results fall outside of standard ranges, consult with a healthcare professional for an in-depth interpretation. They can help you understand the implications and suggest personalized wellness strategies based on your overall health profile.
How should I package my biomarker sample for shipment?
Utilize a triple packaging system by placing your sealed sample container inside a leak-proof secondary container, then enclosing it in a sturdy outer container. Clearly label the package according to biological substance regulations to ensure safe transport.
What actions can I take based on my biomarker insights?
Review your biomarker report and categorize recommendations into immediate, short term, and long term actions. Focus first on significant markers and create a personalized wellness plan that integrates these recommendations across nutrition, exercise, and stress management.
How do I track the shipment of my biomarker sample?
Select a shipping method that offers tracking capabilities and obtain a tracking number after shipping your sample. Periodically check the tracking status to confirm that your sample has been received and remains in appropriate condition during transit.
Recommended
- Biostarks | Sport Performance
- Biostarks | Nutrition
- Biostarks | Collection
- Biostarks | Biomarker Testing for Longevity, Metabolic Health, Nutrition & Weight Loss


